Build a Personal Data Center

We are going to focus on using IONOS Data Center Designer, building our Ubuntu VMs from scratch. And creating the services we need.
Table of Contents
- Creating Secure SHell (SSH) keys.
- Publishing your Public SSH key on GitHub.
- Using Data Center Designer to build a VM
- Install Ubuntu from disk.
- Secure Your Ubuntu Installation.
- Creating a Virtual Private Network (VPN) Server.
- Creating a Personal Data Server (PDS).
- Creating a Domain Name System (DNS) Server
- Generating OpenPGP Keys.
Creating Secure SHell (SSH) Keys
Secure SHell (SSH) keys are always generated in a pair. A public key that you give out and a private key you keep safe. These are mostly used to access systems by command line through a terminal. They are the most common way to access Linux servers and other services such as GitHub.
For the purposes of this walkthrough, please follow step 1, then return here.

Publishing your Public SSH key on GitHub
The reason we want to do this is during the install of the Ubuntu Linux operating system, it can reach out to GitHub, grab your public SSH key and disable password based authentication from the start.
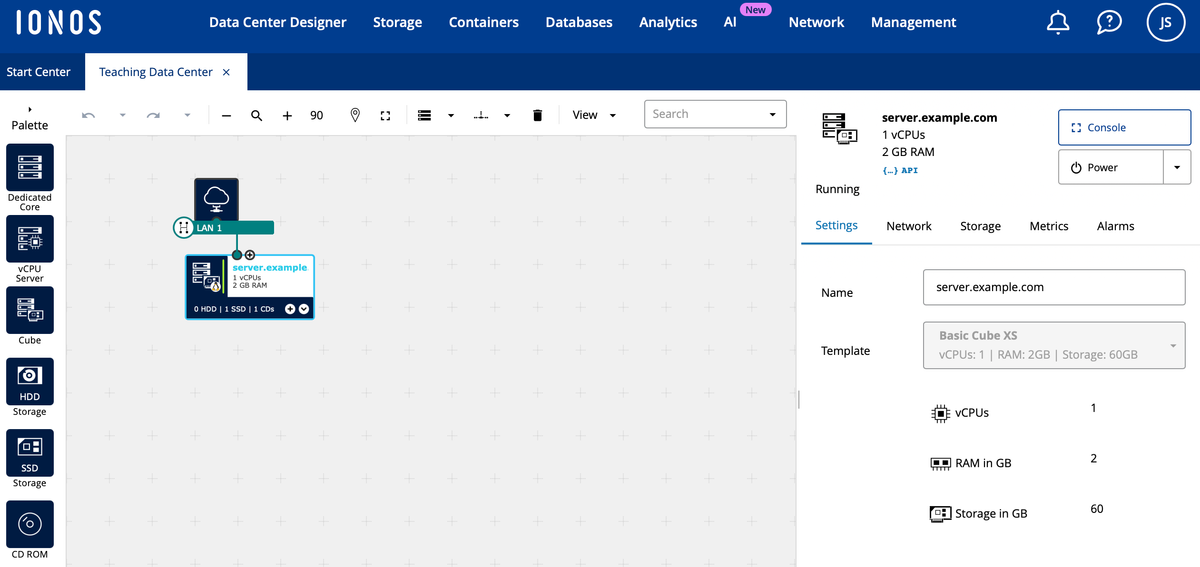
Using Data Center Designer to build a VM
There's hudreds of options for hosting companies and some may be better but many are worse. Typically when you use a VPS service like Digital Ocean, you're using a VPS that has bad IP reputation (gets blocked a lot) and they're pre-installing your operating system for you with their modifications.
IONOS Data Center Designer will give you the autonomy to create your own data center without their fingerprints being left on your server.
Install Ubuntu From Disk
I am a huge fan of installing your operating system without a hosting provider adding their touches to your install. Some, such as Digital Ocean will add their own SSH keys to the image which gives them persistent access to your VM. Not ok.
Follow the directions below on how to provision a general use server. We provision the same general use server for our Virtual Private Network server.
When I first got into Linux, I remember printing off screen shots of Ubuntu 4. F-O-U-R. And that's how I got started with installing it. That's why I made the guide here. This will walk you trough screen by screen.
Secure Your Ubuntu Installation
With this guide you can jump to the end. You'll be creating basic firewall rules on the system that will only allow you, within a rate limit, to access the server. That will keep the riff-raff out.
Now for the fun stuff.
Creating a Virtual Private Network (VPN) Server
The next step is to build a VPN server so you can access your data center and encrypt all communications from your local network. That allows you to use Wi-Fi networks with increased privacy. Your DNS queries and traffic bound for the internet should not be accessible to others. It will not prevent you from someone trying to attack your machine locally so please still ensure you enable the firewall on your personal devices.

Creating a Personal Data Server (PDS)
The personal data server is how you can hold all your posts, media, and authentication for the social networks that use AT Protocol. This is how you don't get de-platformed and the only person that can take you down is yourself.
Creating a Domain Name System (DNS) Server
Create another Ubuntu VM and follow the guide below. The purpose of this is to block ads, malware, trackers, and telemetry data.

Generating OpenPGP Keys
GPG / PGP / OpenPGP keys are similar to SSH keys. They have a public and private pair. You can use these keys to encrypt anything. Files, emails, messages, etc, and it is the only way to truly make sure your communications and files are private.
We are going to use these keys along with a service such as Keyoxide to verify our online identity.